The best point of my week is when I can start to make my own Sourdough Bread and I think you should try it at least once, to see if is this your thing or not. Before I made a decision about creating a starter then baking bread I didn't bake bread regularly, so just to send a bunch of confidence: I've started this from zero too.
Before I published this recipe, I went through more than a 4 month long experimenting period because I really want to make sure, it constantly gives the result I expected. I had many failures at the beginning but I recognized my mistakes then corrected the recipe, so now I believe if you follow these steps, you can bake your sourdough bread you will be happy with!
The reason why I will be more detailed this time is very simple: I would like you to truly understand what's going on in each step of the process, to avoid major failures and disappointment. I went through those schoolboy errors and ended up with a flat bread, and textures like rubber, so you don't have to!
I would like to say, sourdough bread baking at home it's not an express project.
Active preparation time is not long, but there are necessary long 'waiting for the miracle' periods in between the active prep steps because our natural leaven requires a bit more patience... but the unbelievable result is worth all the effort!
Ingredients
Look at this list: only 4 ingredients (actually 3 since the starter = flour + water) what makes a good sourdough bread!
- 400 g flour = I use 300 g organic bread flour + 100 g whole wheat flour
- 325 g tepid water, room temperature (e.g. still mineral water) = 300 g to dissolve the starter + 25 g to dissolve the salt
- 75 g active sourdough starter (leaven) - if the starter is on 100% hydration = 37,5 g flour + 37,5 g water
- 8 g salt
- Rice flour
Instructions
Let's see what it looks like in practice and just to see an example of how I schedule my preparations and baking I tell you how I incorporate bread-making into my everyday life, even on workdays.
Everything starts at least one day before baking.
I keep my sourdough starter (click on the link to read more about the starter) in the fridge to slow down its digestion process, so first of all, I take it out of the fridge. If there is a hooch on it, pour it off, if the thin top-level is grey-ish, I normally discard that too and use only the fresh-looking starter.
This recipe asks for 75 g ACTIVE starter = leaven. So what I normally do: I make a bit more since I'll need to put some starter back in the fridge too, to keep it alive, right? So let's say I would like 75 g for the bread + 45 g to keep = so we will need 120 g leaven at the end.
I use 100% hydration leaven for my sourdough bread. It means that the flour: water ratio is 1:1. How it's possible? The starter is on 100% hydration since the very beginning because we feed it with an equal amount of water and flour all the time, so if you prepare your leaven and keep up this feeding method you can make sure your starter/leaven is on 100% hydration too, just add equal amounts of ingredients, by weight: 1 part sourdough (straight from the fridge) + 1 part organic flour (g) + 1 part tepid water (g). As you can see they are three thirds together.
The following calculation will help you to figure out what is the weight of one third:
THE WEIGHT OF EACH INGREDIENT (g) = Leaven (g) / 3
Example:
Let's see how much of the refrigerated starter we need to make 120 g leaven after feeding: 120 g (leaven) / 3 (since it will be one third) = 40 g refrigerated starter (or any other ingredient since they are equal in weight!)
Now you know everything to feed the refrigerated starter properly to get the leaven for baking and keep some alive in the fridge:
40 g refrigerated starter
+
40 g organic flour
+
40 g tepid water
=
120 g leaven (75 g for baking + 45 g goes back to the fridge)
Pour 75 g leaven into a container and keep it on your countertop slightly covered. Make sure you keep the starter at the right temperature (room temperature or slightly warmer): if your kitchen is too cold, let's keep the starter slightly closer to a heater or so. Place the leftover 45 g starter back in the fridge for a maximum of one week when you will bake again. Please take a note: even if you won't bake, you have to feed the starter weekly!
If you do it before you go to bed, in the morning you will find your leaven so active and bubbly on your countertop.
SCHEDULING: I prepare the leaven before going to bed after midnight, it takes about 10 minutes (active time). In the morning, 6-7 hours (waiting) after feeding it's ready for mixing.

Sourdough Starter Feeding - Photo by © Reka Csulak

Sourdough Starter Mixed - Photo by © Reka Csulak

Active Sourdough Starter - Photo by © Reka Csulak
This is not a step of the process, but I would like You to understand the basic definitions of baking. If you ever heard about bread making, you discovered the word 'hydration' with a percentage in the recipe, or in the caption of pictures that talented bakers share. I would like to share the formula I use to calculate hydration in a simple bread recipe like this.
DOUGH HYDRATION (%) = Total water (g) / Total flour (g) X 100
What is very important, you should include all the water and flour the recipe contains, and this is where the hydration of the starter is important too. If you have your starter on 100% hydration (in the previous section you can read about it in more detail), I show you an example for calculating the hydration of the dough through the example of this recipe (check the quantities at the ingredients list).
Example: 362,5 g water / 437,5 g flour X 100 = 82.8% hydration dough
- Place the different flours in a bowl and mix them together.
- Dissolve the leaven (75 g) in (300 g) water and add this solution to the flour. (with this you can skip the autolyze step)
- Mix the ingredients and knead the dough. You can knead it by hand or simply use a mixer with dough hooks.
- Let the dough rest for 20 minutes. Make sure the temperature is still right.
- In the meantime dissolve the salt in 25 g water.
- After 20 minutes incorporate the salty water. The dough tells when you can finish kneading, so I normally do not follow recommendations like how many minutes I need to spend kneading a dough.
- Window-pane test: grab a piece of dough with oily hands and try to stretch. If you can stretch the dough without breaking it, that means the gluten is well-developed and your dough is ready to rise.
SCHEDULING: I do the mixing after I wake up; the mixing takes 15 minutes in total (active time), then we have 20 minutes resting time (waiting time) before adding the salty water.

Sourdough Kneading - Photo by © Reka Csulak
- Use a bigger plastic box, and brush with some oil to cover the inside.
- Place the dough in the plastic box.
- Now you need to fold the dough and then repeat it in 30 minutes intervals:
- Grab the dough with wet hands in the middle and pull it up till you can fold one end under. Repeat it on each side and from as many directions as you can.
- The temperature is still a key point! If it's too cold, the leaven won't work as it should be.
- The dough will tell when it's ready: when you notice large bubbles and plenty of tiny ones through the side of the box, it's ready.
SCHEDULING: for me, it takes about 3 hours (waiting time) to get the ideal activity in my dough. It means I do 6 folding which actually takes about 10 minutes (active time) in total.

Sourdough Bulk Fermentation - Photo by © Reka Csulak
- Take the dough out of the oily box on a lightly floured countertop. From this step, I use rice flour when I need to handle the dough.
- Get some flour on your hands, turn the dough upside down.
- Start to do a couple of rounds of envelope folding on the dough:
- Grab one edge and fold in the middle, do the same with the opposite side, then from the top (or bottom) to the middle.
- I use a dough scraper to finish the shaping: I hold the scraper 90° to the countertop and push the dough away from me, then pull it backwards. What you should notice is the surface of the dough becomes smooth, even and less sticky. We make the gluten structure of the crust even stronger with this step while stretching only the covering layer of the dough by these pushing-pulling movements.
SCHEDULING: it takes only 5-10 minutes (active time) to shape my bread

Sourdough Shaping - Photo by © Reka Csulak

Sourdough Shaping - Photo by © Reka Csulak
- After you have a nice, shaped dough it's time for proofing.
- You can use a simple bowl, loaf tin or a nice rattan banetton for this step.
- If you use a banetton, it's not necessary to it with a kitchen towel, and as a result of its nice structure, you will get a nice pattern on your bread. If you try this for the first time, make sure you completely cover the banetton with rice flour, because the dough sticks in soooo easily, which is a bit annoying after you spent many hours with bread making, right?! :)
- If you use a bowl, loaf tin for proofing, you will need a clean kitchen towel too. Cover the inside of the bowl or tin (or banetton) with the kitchen towel and add a generous amount of rice flour to avoid the dough sticking to the fabric.
- So place your shaped dough into the preferred proofing tool upside down, and leave it at the countertop for an hour. The temperature still shouldn't be cold!
- After that, let's place your dough in the fridge for 12-15 hours. The cool temperature slows down the process which helps us to plan our bread baking, plus it gives a very nice texture to the crust.
SCHEDULING: I normally finish the shaping one hour before I go to work in the afternoon, so it has 1 hour (waiting time) at the kitchen counter, then it goes into the fridge for 12 or even more likely 15 hours (waiting time). For me this length is ideal since after I put the dough into the fridge I go to work, then sleep and in the morning the dough is ready for baking.

Sourdough Before Overnight Proofing - Photo by © Reka Csulak

Sourdough After Overnight Proofing - Photo by © Reka Csulak
- The following morning the first thing is to turn on is the fan programme on the oven and set the temperature to maximum.
- If you don't have a steam program on your oven -like me-, place a deep roasting tray to the bottom of the oven. Let's boil about 1000 ml of water. When it's boiling, pour into the roasting tray in the oven. Yes, we're making steam. I bake my bread on its own, I do not use a casserole dish or PIREX bowl, so creating steam in my oven is essential.
- When you notice, that the water started to boil in the roasting tray too, it's time to get your banetton (or proofing bowl) out of the fridge. If you push the dough gently with your fingertips, it will 'bounce back', which is the best sign that it's ready to bake.
- Let's grab your sturdy baking tray, baking sheet or pizza stone and sprinkle some flour on it. Turn your banetton upside down like you would unmould a small sandcastle. If you covered your banetton or tea towel with enough flour, the dough should land without sticking to the proofing items.
- If you leave the bread there too long without placing it into the oven, the dough will start spreading and being flat, so make sure you do everything quickly after you get the dough out of the banetton.
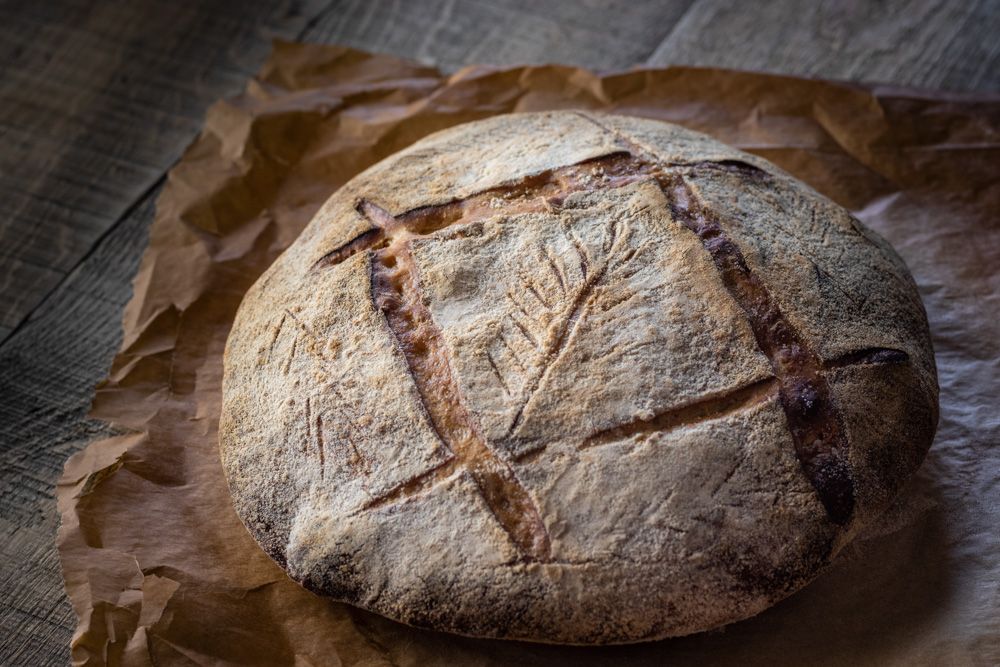
- Quickly score your bread with bakers' lame, razor blade or a sharp knife. It does not just give the bread a nice appearance, but it helps us to control how the dough rises during baking. If you would like to get the same flour-covered loaf as the one in my pictures, just sprinkle your bread with rice flour before scoring; as you can see the bread shows the true crust colour along with the cuts only.
- Place the bread into the oven. The first 15 minutes is the essential part, this is when the bread will rise and achieve its final shape. If it won't get the steam, the rise won't be too impressive. After 15 minutes I normally continue the baking for another 15-25 minutes, depending on when I get the desired crust colour and what is even more important when the loaf gets a hard crust on the bottom. That state what I try to catch at the right time since it indicates that the bread is well baked on the inside too and it's not raw at all.
- When your bread is ready, has a nice crust all around, just keep it on a cooling rack and let it cool down for a minimum of an hour before trying to slice.
SCHEDULING: Heating up the oven included creating boiling water and steam take about 20 minutes (active time), the actual baking time is about 30-40 minutes (waiting time) and the resting time till it cools down is a minimum of 1 hour (waiting time).

Sourdough Out Of Banneton - Photo by © Reka Csulak

Sourdough Scoring - Photo by © Reka Csulak

Sourdough Bread - Photo by © Reka Csulak

Sourdough Bread Texture - Photo by © Reka Csulak
Here is an estimated, total preparation time:
- Active time: ∼ 1 hour
- Waiting time: ∼ 24 hours
It seems a bit long but if I can share my feelings about real bread baking: as a person with limited free time, I still say: to start baking my own sourdough was the best gastro-decision I've ever made. I literally spend all my free time with my projects, but I still find that one hour, that is needed for the active part of this recipe! I bake only one bread per week, but I think this is how we appreciate and respect it the most. If there would be as many as we could eat, the value of it would be much lower.
What I've noticed since I changed the bread to sourdough about my diet: I need to eat less bread, because it's filling. This bread is so tasty, I could eat it on its own! It won't leave me with the feeling like I have a stone in my stomach after I eat it, because the leaven won't affect my digestion in a negative way. By the way, when I eat non-sourdough bread, that feeling always comes back. Once I've heard in a documentary that proper sourdough could be ok for people who are not allergic, but gluten intolerant. I don't know if it's true or not or how it works in practice, but I experienced only a positive effect on my body!
If you ended up here, I'm sure you are interested in bread baking, so do not wait till next Monday, let's do it now! If you do not have your own starter, you can find my guidance here, about how to prepare a good one and how to care about it.
Please share your experiences and make sure, to show me your own bread!


