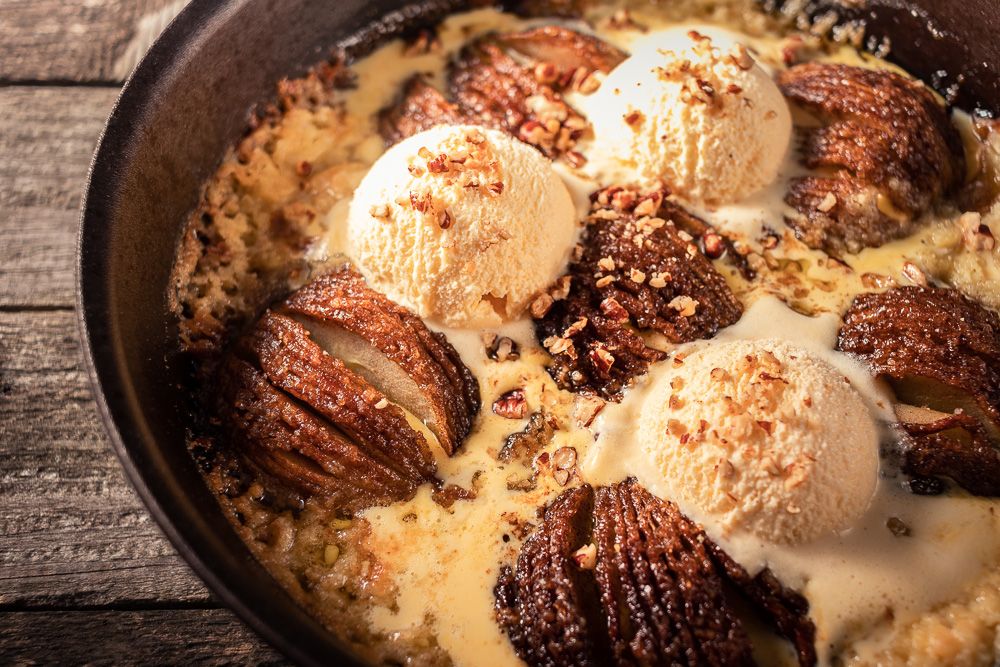
Styling ice cream isn’t just about pretty scoops - it’s a full-on time-sensitive mission. It melts, slides, sweats, and sabotages your shot if you’re not prepared. But when done right, it’s magic. That barked surface, glossy texture, the playful drips, the perfect scoop perched just so.
This Pro Tips episode features clever styling hacks from 41 brilliant creatives (and me). These contributors - photographers, stylists, and food content creators - have all battled the melt and lived to share their most reliable tricks.
From choosing the right tools to working with real vs. fake ice cream, you’ll find practical solutions to your chilliest styling challenges. Whether you shoot for clients, personal projects, or just want to master the scoop, these tips will help you keep your cool.
Want to catch up on previous Pro Tips episodes? Click here to explore the full series.
What is their pro tip for styling ice cream?
Before you scroll any further, grab your favourite hot drink or smoothie, find a comfy place, and get ready to dive into this inspiring read!
" I always try to use real ice, although I know there are some really real-looking fake ones. My trick is to set everything in place: styling / lights / etc and when that is okay, I'll add the ice cream. "
Maaike Zaal - cocktail-, food- & product photographer
" If I am styling sundaes or other foods where the ice cream has to stay put for long OR I need some filler scoops as a base to ladle the actual product onto, I make a dummy ice cream out of powdered sugar and egg whites (just mix it in a food processor) and colour it to match the product. When you get the consistency right, it will scoop and ridge just like the real thing!
It's good to plan well ahead with ice cream shoots. I will always practice with the client's product, as ice creams can differ a lot in consistency and melting point. Also it's good to have some nitrogen ice, plenty of ice boxes and all needed equipment in order to execute everything right. I will always add one extra day for equipment acquisition, prep and testing, because especially with commercial shoots you cannot leave anything to chance. "
Meri-Tuuli Väntsi - food stylist, chef, content creator
" Pre-scoop good looking ice cream portions in the freezer in advance to swap out a melted model. "
Jella Bertell - food blogger
" Whipped cream, butter, fondant, conditioner and cornstarch.
I love making fake ice cream. As you know, ice cream has a lot of kinds, the soft one, the super creamy one, etc. I can use a lot of ingredients like food coloring, whipped cream, butter, fondant, even conditioner and cornstarch. Depends on how you want the final result to look like. "
Natasha Maria Putrianti - food stylist
" Just a preference, but I always use real ice cream and not the traditional food styling ingredients. I work close to a mini freezer, over scoop ice cream into balls and put into freezer for hours before shoot on a parchment lined cookie sheet, and off-set use dry ice to style the individual hero scoops (having gloves handy for working with dry ice). If I need a specific color, I melt ice cream and add food color.
As a Photo Stylist, I'm a firm believer in never asking a Photographer: "can you fix, add color, etc in photo shop/post production? It's my job as a Stylist to get it as perfect as possible. "
Bonnie Aunchman - commercial photo stylist
" Set the scene, test light and focus, be really quick! "
Lenka Selinger - photographer & food stylist
" Be sure to dip the scoop in water between scoops so that each scoop is clean and you get nice barking. Also, when possible, I opt for lower-fat ice cream because it holds its shape longer than ice cream with higher fat content. "
Joanie Simon - photographer
" Shooting ice cream is a speedy affair by necessity!! Get everything ready while the beautiful ice cream hero rests in the freezer, ready to whip out and position to hopefully capture the perfect shot before it melts. If you need more time you can pop it back in the freezer for a few minutes. Also, it can be good to embrace a bit of meltiness as it’s quite pretty in its own way!
One of the perks of photographing ice cream is the short shooting time! You can’t spend hours fiddling with the styling and set up once the ice cream is on set, or you’ll be photographing a puddle so it’s all wrapped up fairly quickly. "
Krissie Oldroyd - food blogger
" Have the whole scene prepped and then scoop the ice cream right before shooting. I actually like the look of ice cream when it’s beginning to melt a bit so, once scooped, there’s a still some time to play around with it. "
Julia Konovalova - food photographer & food stylist
"
- Melting effect: allow a small amount of ice cream to melt slightly for a natural and inviting appearance. Drips down the side of the bowl can create an indulgent touch.
- Texture contrast: pair smooth ice cream with crunchy toppings for added depth and visual interest, making the dish more appealing.
- Scoop the ice cream into your desired shape and refreeze overnight to ensure it maintains its form for longer.
- Use pre-chilled glasses or plates to slow down melting during your photoshoot. "
Nisha De Silva - food/beverage photographer & stylist
" Oh ice cream! I'm not sure if people will agree with me but I find styling homemade ice cream much easier than store bought. I think it has a better consistency.
I recently shot a banana split (with store bought) and let me tell you - that it took a few takes! I did the process shots first-( that melted) and I had extra ice cream to use for the heroes. I scooped out what I needed into individual bowls and placed it in the freezer until I was ready for the heroes (keep the whip cream in fridge until you ready to use as well).
You will want to move fast! Make sure the camera, the props and everything are in place before you pull the scoops out. "
Kristina Cadelina - food blogger & photographer
" Style EVERYTHING else first. Use strobe instead of continuous (those lights can get hot if they're not LED). "
Nikki Jones - photographer
" When styling frozen treats like ice cream I like to style my subject and then put it back in the freezer while I set up the rest of my scene. That might look like scooping ice cream onto a parchment paper lined tray and then popping it back in the freezer to cool down and firm up while I get everything else ready. "
Kirby Mekler - photographer & food stylist
" To be photographable, the ice cream needs to have the right consistency, not too soft, nor rock like. So keep in mind that milk ice cream melts slowly, is firmer and creates heavier drizzles, compared to the fruit based ice cream (or the one without milk) - which is lighter and melts faster.
Whatever ice cream you are shooting, it's better to scoop it before you have your set ready. I prefer to make ready the scoops, put them on the freezer, set my setup, make some prove with all of that (composition, lighting, camera settings), and then add the ice scoops for the final image. "
Anna Ilieva-Alikaj - photographer
" Making it beforehand always saves so much time. You can use whipped cream powder to give you that soft serve look. Just use lots of powder with little milk and it will hold shape for hours! "
Hadeel Magdy - food stylist & photographer
" My tips is always same with mostly senior food stylist out there, be more expert to do that is the main key. Increase your knowledge about food is always useful. For example, if the ice cream brand wants to use their original product, you need to know which one contains more fat and which one contains more vitamin A,B,C - these effect the melting speed. "
Fatula Waluyo - food stylist
" Styling ice cream? If it's real, I prep e-v-e-r-y-t-h-i-n-g before shooting because it melts sooo fast. With fake ice cream, I sketch and research beforehand, so I know exactly what I want - and take my time to get that perfect look. "
Irina Lopik - photographer, prop stylist

© Irina Lopik
" To keep in mind that everything - and I mean everything- must be ready before you add the ice cream to the scene. When I scoop the ice cream, I normally warm up the scoop with boiling water before scooping. If I shoot the ice cream, I use only a bit warm water so the that the ice cream doesn't melt so quickly. "
Aino-Kaisa Sihtola - food blogger, vegan cookbook author, chef
" I tried a few times with real ice cream. It's better if you have a good scoop, enough ice cream and everything on an arm stretch distance prepared in advance. Shooting in the Winter on an open window is helpful.
Next step will be to try that recipe with starch and hair conditioner and then will know if it works. "
Milena Ugrinova (Mim) - photographer
" If you're using real ice cream, the best thing to do is to prepare your scoops by scooping them all out on to a tray and then keeping that in the freezer until you're ready for the final shot. This allows you to pick the best looking scoops and to place the scoops on your cone or in your bowl quickly. "
Audrey Marie Bufalini - photographer
" My pro tip is to use fake ice cream when you can, but if you can't, I make an ice cave by lining a cooler with dry ice and keeping my pre-formed or completed hero in there until it's ready to be shot. You have to be careful not to leave it in too long or it will develop too much frost which will affect how your ice cream looks. "
Suzy Eaton - food stylist
" Sometimes it's ok to use fake ice cream but if the brand request real ice cream or of it's a part of a recipe I love to prepare my scene in advance and lastly scoop ice cream to prevent it from melting. This is very last step before I take pictures. "
Kristina Struharova - product photographer, videographer
" Complete the entire set up, and keep your lights and camera ready. Ice cream should be the last thing one needs to add in the frame. Else you can capture ice cream during winters and keep posting it later during the summer. "
Basil Hashmi - still life photographer
" Freeze the scoops. And you still have to be veeeeery quick. "
Satu Koivisto - food writer
" When I’m able to, I prefer to create my own fake ice cream with icing sugar and frosting! Regardless, definitely toppings and syrups to make it more interesting. "
Karen Loza - food photographer & stylist
" Scoop it out onto a cookie sheet and put it back in the freezer until it’s time to take the photos, as well as freeze the dish the ice cream is going in, if applicable. "
Austin Claire Hackworth - photographer
" Scoop out your ice cream before hand onto a baking sheet and freeze it. Use a stand in till you are ready to go for the final shot. When ready, bring out the actual scoops and fire off. "
Gouthami Yuvarajan - food photographer & stylist
" I use a traditional recipe with a mixture of icing sugar and frosting to make fake ice cream, work the ingredients together by hand or using a machine and I create the texture with the ice cream scoop that has a trigger. It's best to have different sizes available as the scoop size depends on the container or the cone.
If it's a glass container that requires more ice cream at the bottom, I add additional fake ice creams without shaping it so it looks fuller. I make sure I leave an even surface so the fake scoops sit evenly or I elevate the back surface a bit if it is a side shot and the last scoop is hiding.
If the ice cream scoop consists of different flavors, I roll out the fake ice cream doughs of different colors just like pastry and I make sure to scoop both them from the tray horizontally diagonally or vertically (depending on the effect we are going for). If it has additional toppings such as nuts I make sure to mix that in the recipe before scooping. I use food coloring to reach the desired flavor color.
If it's a sundae and it needs whipped cream with the topping, I use the recipe from above. Any toppings that otherwise would sink I place them onto the top with a toothpick. For shine and viscosity we can add some high fructose corn syrup and for soft serve ice creams I add more frosting into the original recipe and pipe it from a piping bag. "
Henriett Braun - food stylist

© Henriett Braun

© Henriett Braun
" Keep the room you're working in chilled if you can. Have everything set up and ready in your scene before bringing in the ice cream. This includes lighting, props, camera angle and settings. Create your scoops and freeze them the day before. And always have extra ice cream on hand. "
Emily Miller - photographer, recipe developer, blogger

© Emily Miller
" Refreezing ice cream balls after scooping helps them keep their shape longer. "
Kata Endrődi - photographer
" Styling ice cream can be a challenge, but with the right preparation and strategy, it’s possible to capture that perfect, mouthwatering shot. Whenever I work on ice cream shoots, I typically collaborate with a stylist. That said, there are a few key considerations I’ve learned that make all the difference in achieving the best results:
- Prioritize storage: keeping ice cream in optimal condition before the shoot is crucial. Proper storage, preferably in a freezer close to the set, ensures the ice cream maintains its shape and consistency. Using dry ice is an excellent way to keep everything cool on set, providing a reliable backup for those warmer shooting environments.
- Pre-prep your scoops: when working with real ice cream, it’s important to pre-scoop several servings before the shoot begins. Always prepare more than you think you’ll need - it’s better to have extras ready to go than scramble mid-shoot. Once scooped, store them on a tray in the freezer to keep their shape until they’re ready for their moment in front of the camera.
- Plan your hero shot strategy: a key tip for ice cream photography is to get all the composition and lighting dialled in without the actual ice cream scoops first. Once everything else is set, it’s time to bring in the hero scoops. This approach minimizes melting time and ensures the final shots look flawless.
Ice cream shoots are all about strategy and preparation! "
Joanna Wojewoda - photographer
" I have mostly worked with real ice-creams till now. The biggest challenge is to capture its texture before it starts to melt. Though I prefer a slight melt on the ice cream, since to me, it makes it look more natural and brings out its character. I also believe the slight melt has this effect that makes the viewer feel the urge to pick it up before it all melts down.
My approach is to first compose the full shot using en empty ice-cream container as a placeholder, while working on finishing the setup around it; and then replacing it with the readied ice-cream serving right before you are ready for the shot.
Usually the scooping too happens right before the shot is ready to go. The other way I have shot ice-creams is readying the scoops before hand and freezing them in a dry ice refrigerator. Dry ice temperature freezes the scoop so much that it can stay intact even if left outside the freezer for a couple of minutes. "
Abhishek Khanna - food photographer & stylist
"
- Try to shoot in a cold room to preserve the integrity of the ice cream. In the winter, I sometimes shoot with a window open. In the summer, I blast the AC.
- I keep my popsicles in the back of my freezer before a shoot to slow down their melting process.
- When shooting a cone, I generally do not fill it with ice cream from the bottom. I fill the bottom with scrunched up foil or plastic wrap then stack the ice cream on top to hide that it is not full. This helps prevent excess waste in case I need to reform the topping scoops multiple times.
- I always have my entire scene setup before I start shooting ice cream as it is very temperamental. That way when I am set on the styling of the scene, the position of my tripod, and my camera settings, I bring in the ice cream and quickly start shooting."
Murielle Banackissa - food photographer, food stylist, blogger, cookbook author

© Murielle Banackissa

© Murielle Banackissa

© Murielle Banackissa
" I prefer preparing soft-textured ice creams like sundaes. To achieve the best effect, apart from using a fictitious cream that makes the work easier and doesn’t melt, the nozzle you use is crucial. In my case, I custom-make them. "
Oscar Sanz - food stylist
" The trick to ice cream is to make sure the props and lighting is as close to how you want it as possible before adding the ice cream. To see how the light will work on ice cream I use cotton balls as temporary stand ins. They are round and have a slight texture like ice cream. "
Anisa - photographer, recipe developer
" Put a plate into the freezer and scoop balls of ice cream, placing them onto the ice-cold plate. Store your plate of scooped ice cream in the freezer until the final moment before taking the shot. "
Jane Coupland - photographer, content creator, blogger
" Use a frosting mixture.
I don't often do this for restaurants because in Australia we often work with gelato, however for ice cream specifically I have made my own ice cream using a specific frosting mixture that I buy from the supermarket.
- In Australia it's called Betty Crocker Frosting and I use the Vanilla and add food colouring to change the colour.
- I've also used cornflour + hair conditioner, however I find that this method has quite a strong smell and the substance goes mouldy fairly quickly. "
Kera Wong - creative
" I've used a mix of shortening and powdered sugar as a stand-in for ice cream during shoots - it holds its shape under lights, allowing you to perfect the hero shot without melting worries. "
Shwetha Elaina - food photographer & stylist
" I like to install my set up and make sure everything is good (light, styling, composition) so I just have to add the product last minute and take my picture. "
Constance Ibañez - food photographer, culinary event host
" Honestly, photographing ice cream isn’t one of my favorites. It’s a very delicate task.
A couple of general things I always use when it comes to this are pre-chilled cups or bowls. This is important to prevent the ice cream from melting too quickly. The cold surface helps slow down the melting process. Silicone molds can also be really useful as they perfectly maintain the shape of the ice cream during the shoot while keeping the texture realistic.
And of course, if you’re photographing real ice cream without any tricks, make sure to shoot really, really fast! "
Liliána Tóth - food photographer
" Prepare and shape the ice cream a day prior to the shoot, then freeze it in an airtight container. On the day of the shoot, I will minimise handling to keep it intact and I’ll have about 10-15 minutes to capture the ice cream. "
Marika Cucuzza - food photographer, recipe developer, content creator
" If you are shooting an ice cream hero (product/recipe) then the ethical way is to use the real thing. I like to pre-scoop the ice-cream and re-freeze the individual scoops until use. I always set up my scene with a stand-in and bring the hero only when everything is finalised on set.
If the ice cream is not the hero but a prop, then it's ok to opt-in for an alternative that does not melt. My favourite scoopable fake ice cream recipe is simple: mix ready-made frosting with the amount of icing sugar that gives you the desirable consistency and colorise the mixture according to the flavour you wish to imitate. When you use ice cream replacement, you do not have a natural melt - you can replace this by brushing coloured double cream to the edges of the scoop. "
Reka Csulak - photographer, stylist, recipe developer, mentor
